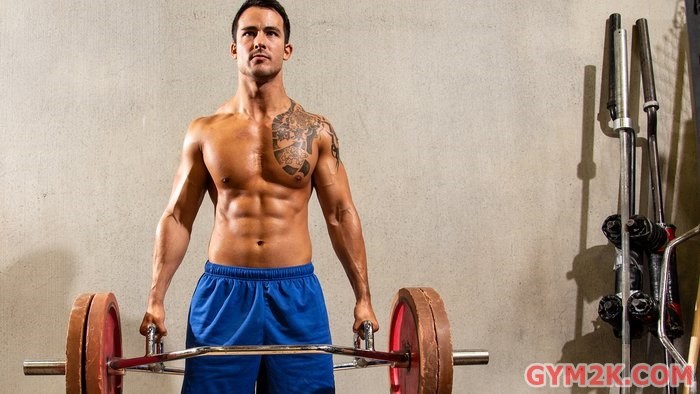
A while ago, in Internet "expert" land, someone decided to blast out the idea that deadlifts aren't deadlifts unless you're using a straight barbell. A trap bar, they said, is something different. It's kind of a squat, kind of a leg press, kind of a cheater deadlift. Well, they're wrong.
My respect to the people who can grip and rip a whole heap of weight using a straight barbell. Ain't nothing wrong with that. But the truth of the matter is, unless you compete in powerlifting or another lifting sport where barbells are required, the vast majority of people can get all the same rewards, with fewer of the risks, using a trap bar. That's why I wrote this. Because someone had to.
The truth of the matter is, using the trap bar is one of the smartest moves you can make as a lifter who's after deadlift performance. It's time someone made a case for this lift. Here are my reasons for loving it, and how I like to program it.
Reason 1: It's Friendlier to Lifters with Long Levers
A 6-foot-6 basketball player, or someone of similar size, will almost always have an awkward and difficult time attaining a strong barbell deadlift, and the reason has much less to do with their so-called "mobility" than many coaches are willing to admit. In truth, it's about leverage. Some of us are built in ways that simply aren't conducive to strong pulls using the straight bar.
Having a strong pull means the bar needs to travel in a straight line from bottom to top. It also means the shoulder blades need to start in a position above the bar to create the sturdiest base of support. Remove one of these two factors and not only will your form suffer, you'll have a low ceiling on how much you can lift. To illustrate, check out my quick tutorial on barbell deadlifting.
The reason why the trap bar creates less of a problem for taller or longer-limbed lifters is due to the fact that there's no longer a straight bar blocking the shins from migrating forward via ankle dorsiflexion. It's already aligned with your center of gravity. This allows a lifter to drop their butt a couple of inches, keep a straighter spine, and ultimately pull from a safer and more powerful starting position.
Reason 2: It Promotes Healthier Shoulders
We've all seen a deadlift performed with a double overhand grip. Though everything is symmetrical when performing pulls this way, there's no escaping the fact that even a double overhand grip is still promoting a loaded pull while internally rotated at the shoulder joint.
That may not be much of a problem if you're not into lifting ultra-heavy, or if you don't have a history of poor posture. Unfortunately, I'll go as far as to assume that 5 out of 10 people reading this are dealing with one of the two. For those reasons, lifting with the neutral grip that a trap bar can provide places your arms in a slightly externally rotated position. This is both closer to healthy anatomical position, and much more similar to the real-world posture for carrying a heavy load.
Reason 3: It Hits All the Same Muscles, But is Safer on the Spine
In all honesty, you can target your posterior chain a bit more easily when performing barbell deadlifts. I'll admit that. But the reality is this: Most people who like to pull really heavy from the floor aren't doing it to zero in on their glutes and hams. They're doing it to crush a strength PR, and just to be able to pull heavy. And heavy trap bar deads still make the glutes and hams work plenty—just not quite as hard as the barbell deadlift. It works all the same muscles, in slightly different ratios.
The difference is what happens at the spine. When it comes time to lift heavy, no matter how strong you are, you're placing yourself at a greater risk for acute lumbar spine injuries compared to doing the same thing with a much lighter load. It just takes one missed rep.

Now, think about my first point. If you're a person with leverages that aren't favorable for deadlifts, you're probably at even greater risk. But time and time again, we try to force-feed this lift to ourselves and our clients, telling them they need to meet arbitrary single-rep strength standards in order to consider themselves strong or capable.
I would argue that it's smart to sacrifice that smidgen of posterior dominance that a barbell deadlift may provide in exchange for the more even force distribution the trap bar spreads between the quads, glutes, back, and hamstrings. If you're talking about slightly higher-rep sets, like the 8 reps I'll have you do in the workout below or something higher, that exchange is even smarter.
And if you have any kind of injury history, well, the case is clear. The trap bar allows you to get low, dig in, and crush a new pulling PR with greater confidence.
Getting the Most out of Trap Bar Deadlifts
You can program trap bar deadlifts exactly the way you programmed your barbell deadlifts. It lends itself to pretty much every classic size and strength rep scheme. They're fantastic for cluster sets, which I explained in my article "The Simple Strength Trick to Get the Most Out Of Heavy Lifts." And yes, you can usually pull a bit more on the trap bar than the straight bar, though the amount varies dramatically lifter by lifter.
But before you go balls-to-the-wall and try to clear every plate in the gym, compare the different options the bar offers. I like to think of them as a progression.
Step 1: High Handle
Keeping the trap bar high handles-up is a great introduction to the apparatus, and if it's more comfortable, it's also fine to use throughout your entire training journey. Play around with foot width until you find one that's both comfortable and powerful, and vary your tempo from a dead-stop style to a controlled eccentric touch-and-go method.
Step 2: Low Handle
To get used to pulling from the same place you pulled barbells from, simply flip the trap bar over and use the bottom handle, if your bar has one (most do, but some don't). You'll likely have to hinge farther, since your hands will be farther apart than a typical conventional barbell deadlift asks of them. This will bring in more glute and hamstring activation.
Step 3: Deficit
Set up low handle (or high handle, if your fingers might get mashed on the low handle like in the below video), and then add a plate or two under the feet or step on an aerobic step. You'll have to get down lower, and pull for longer. It also brings in more quad, to go along with plenty of glute and hamstring. It's an easy way to make light weight feel heavier, and also a way to focus on your form.
I believe in increasing pulling space and general range of motion before adding significant weight. Only when you can match your old rep PR's using this three-step procedure should you consider adding more plates to the bar.
Use Indicator Sets
An indicator set is a preselected weight you use in order to gauge your freshness and strength for the day. It's a helpful tool if you go into a workout intending to lift heavy, because everyone has off days, and for most of us, it's best we don't learn that the hard way.
Indicator sets involve a weight you can move with ease, but that's still heavy enough to require perfect form to lift. The empty bar won't cut it, and neither will the first ramping set up.
Personally, in heavy squat, deadlift, and bench press workouts, my indicator set was always 275 pounds. I made sure to hit that number in my ramp each time in order to see how fast it moved. Sometimes it moved like butter, and other times it moved like molasses. Depending on that set, it allowed me to tailor the rest of my workout appropriately. The last thing you want to do is attempt a lifetime PR when you can hardly move half of that weight with ease.
The Best Damn Trap Bar Workout, Period
I recommend alternating these workouts each week. Yes, this means you only get to crush a heavy 3-rep set once every two weeks, but if your goal is long-term progress rather than short-term ego-stroking—and it should be—that's enough. If you're someone who prefers twice a week, sure, you can alternate the two workouts.
Week 1: Heavy/CNS Load
- Empty Cradle x 6
- 30% of 1RM x 3
- 50% of 1RM x 3
- 60% x 3
- 70% x 3**
- 75% x 3
- 80% x 3
- 85% x 3
- 90% 3-5 sets x 3
- Rest 3 minutes between sets.
Indicator set.** I chose 70 percent based on the fact that the workout asks for heavy sets of 3 reps. Seventy percent of this number will likely be a load you can typically handle for 10 reps or more. It's a good place to put an indicator set and gauge your power, speed, and joint stress on any particular day.
Week 2: High Volume
- Empty Cradle x 8
- 30% of 1RM x 8
- 50% x 8
- 60% x 8
- 75% 3-5 sets x 8
- Rest 2 minutes between sets.
One Last Thing: Know What You're Lifting
Trap bars come in many shapes and sizes. At the gym where I work with clients, the trap bars are 45 pounds. At the gym where I train myself, the trap bars are 60 pounds. There are some on the market that are even lighter or heavier than those.
Knowing the exact weight of the bar you're lifting could make the difference between a comfortable 3RM and one that feels difficult for a reason you aren't yet aware of. Take it into consideration!
Now go get in the hexagon, and make some gains without shame!


0 nhận xét:
Post a Comment